Friday 30 March 2012

March Big Project

Hello Canadian person!!!  Welcome!

Today's date is a multiple of 5, but I need to post a second thing as 2 and 5 are so similar.  However, that doesn't mean I can do things in multiples of 2 - who knows?

Any way, here is my old mattress, minus the top fabric and layer of compressed fabrics, threads, mites, dust....

Her she is coyly hiding her nakedness behind a curtain - incidentally, lying  provocatively on her side
Next the base. I took off the plastic base, now in the garden suppressing weeds, in a ball in the corner of the garden.
Next, I removed the fabric from the sides and top........
Can you believe it!!!!  I had hoped the top of the bed base would be hardboard (I have a use for that), but it's cardboard.  Cardboard?

Tomorrow, I shall remove the cross bits of wood (except the centre one that I will leave in to keep it square) and then cover the rest of the wood with one (or two?) layers of parcel tape.  I know how to spend a Saturday night, oh yes!

Have lots more to tell you about, Dear Reader, but not until the 5th!  

How lucky am I ?!? Knitting Paradise swap

Did you notice how I have added my shadow of me taking the photo?  I am a  person of many talents (not all of them useful)
I belong to 2 knitting sites - Ravelry, which has every pattern under the Sun and  a group called Nerd Wars which knits eyeballs, skulls and all sorts of weirdness, in Tournaments that last 3 months.  The other group is Knitting Paradise who are similar but host quite a few swaps.  This was what I received today in the March Swap   You fill in a tiny form about what your likes/dislikes are and that is passed on to your secret partner.  This has all my favourites: log cabins, Canada, cats, a candle, banana (Options drink sachet).  The swaps are held every month and everything has to add up to less than £7, plus postage.

Both these sites are free to join  www.ravelry.com and www.knittingparadise.com

I also belong to similar groups for quilting, also free (of course!) to join.  The British Quilt List at groups.yahoo.com/groups/BQL  
and www.quiltingboard.com


I've also decided to post at dates that are multiples of 5 (you know, the 5th, 10th, blah blah blah).  I do most things in groups of five - don't know why?  Also, one of the blogs I follow scientificquilter.wordpress.com  suggests going on a  '15 minute March' - sew for 15 mins a day in March.  15 is not auspicious enough, so I changed it to 25 mins (5X5) a day and also, I have 5 projects that get worked on in succession.  This is all in an effort to get stuff done and get organised.  This, of course, is the only thing which costs money, as I had to buy a daily planner (make one myself in Word - are you serious?) and a daily chalk board - the best thing about this is that you can list a task to do and then just erase it when you don't actually do it.  


More in just a min...........


Monday 19 March 2012

Oh, and just one more thing - my home-made fabric covered buttons

I've tried beads, buttons and all sorts on my pincushions to cover up the stitches used to bring top and bottom tightly together (oh, if only I could manage that myself!).  I did look at self-covered buttons but they were all too big for what I wanted to use them for.  (Actually, I was just too mean to pay 18p each for them).  So, I came up with the idea of using washers.  I bought a packet from Wilkinsons for 79p (love a bargain!).

I cut out a circle of wadding about 1/3rd bigger all round than the diameter of the washer and a circle of fabric the same size.  

The unexpected beauty of using the washer, is that the hole in the centre allows you to position the fabric and centralise part of the fabric's design.
Here, you can see (if you have the eyesight of a hawk) that I am taking running stitches around the edge of the fabric and wadding circle - after first making a knot big enough to see from Space).  Then, you pull it up tight around the washer.  I had to take a further few stitches from side to side on the back to make it all lie nice and flat.  Then, tie off securely. Sew them on the top and bottom of your pincushion (or on clothing, bags, blah, blah, blah).  They will not need to take any of the strain from tightening the pincushion together, so I just make a cross stitch in the centres to attach them.  You could also add a bead on top, a fancy embroidery stitch or anything else you can come up with.  There you have it - fabric covered buttons for a fraction of the price!

Bits I forgot.............

I've looked back over previous posts and put back in the bits I left out!  Nothing life changing, but they might help if you are new to this game, Dear Reader.

Another thing I forgot, is to mention that I print my graph paper (from www.printfreegraphpaper.com) onto freezer paper and cut out those papers.  These can be ironed onto you fabric, but still need basting - they won't move around though.  To do this, you need to attach the freezer paper to a sheet of printer paper at the top of the page, just with using the iron on it for about 1cm (this stops the freezer paper jamming up your printer) and then cut the freezer paper to exactly the same size as the printer paper.  These can be used many times.

And, another thing.  I don't like pinning my papers to the fabric (in case they bunch up on the right side).  Rather, I would use paper clips to hold the fabric folded over the edge of the papers,on one or two of the sides furthest away from where I start basting.

And, another thing.  There are plastic templates available from quiltpati.tripod.com/id12.html.  I've been following a thread on a group I subscribe to for a daily digest http://www.yahoogroups.com/group/BQL.  This is the British Quilt List and is always interesting.  I'm not sure what else is going on there, as I am only up to Feb.22nd in my e-mails of Daily Digests.  Anyway, you are supposed to be able to baste on the fabric only and then flip out the template.  I've never tried this method and it would appear that you can only buy them from the site mentioned above.  I might have a go with a milk bottle!

Saturday 17 March 2012

Pieced and scrap pieced Hexagons

You could cut each hexagon into diamonds, for example.  You could also cut it into halves or 6 triangles or even weird shapes.  Each of these sections need to be pieced back together to make the original hexagon.  It is usually a good idea to have a whole hexagon in the centre, but then, that's up to you to do whatever you wish.
Ooops!  It would appear that the left hand side hexagon has been misplaced by  my servant: he will be punished.

Or, you could scrap piece your hexagon.  Start with your hexagon and dots drawn on a piece of calico and lay face down.  Slap on a piece of scrap fabric which you have straightened all the sides of and pin in place.
Add a second fabric, matching one of the straight edges.  Your fabrics should be right sides together.  Sew along that edge - I just use running stitch or you could machine it.
Flip over (relax..... the fabric, not you!), press and cut excess away by following the lines of piece no.1
Now, we just carry on adding each fabric in a sort-of log cabin way.  I'm going clockwise, but it doesn't matter which way you go, but you will need to be consistent and piece your hexagons in the same direction for each round.  So, the next piece will go along the new edge formed by both pieces, like so
This third piece was laid across the edge formed by the first two pieces of fabric, right sides together, then sewn, flipped over and cut to follow the 'line' already started by the red fabric and I made the new line on the pinkest fabric arbitrarily - you could cut this line anyway you like as it isn't following on from a 'line' already in place.
You would continue round in this manner until all of the sides of the red fabric are covered...
Now, you can start the second round. Start wherever you wish.  The last fabric sewn in will need to be pinned in place.
I'm aiming for only 2 rows of fabrics for this hexagon and the others to go with it.  Naturally, they haven't yet been sewn (what a surprise...)  When you have covered your foundation hexagon, trim off the excess overhanging fabric.  Sew hexagons together from dot to dot.  Sit back and admire (then stick in a drawer until you decide what's going to happen to it - might be a while......).

101 Uses for an empty plastic milk bottle - No.1 Patchwork templates

I usually just print of a page onto card of whatever grid I choose from www.printfreegraphpaper.com and just cut out the shapes I need.  But, sometimes you may need a template that is more durable or more easily drawn around.  You can cut out your shape a little bigger and make a longer lasting template with an empty plastic milk bottle, like so:-

Staple the shape larger than you want onto the plastic, cut out  your shape on the graph paper lines.  Use this template to drawn around for your paper shapes (TakeAway leaflets and holiday brochures are a good weight).  If you want to use the  template for machine piecing or hand piecing without papers, draw around the template then make holes at each corner as shown on the left with a large eyed needle.  Use a mechanical pencil (or, God forbid! a biro) draw around your template and mark through the holes onto your fabric.  Sew from dot to dot by hand with small running stitch or if you are making a pincushion, with back stitch.  Or, machine from dot to dot. Remember to leave the drawn hexagon and dots side on the reverse of your fabric
Next: scrap piece your hexagon.            

Friday 16 March 2012

Showing off your pieced squares - Tut 1: The Sequel

OK.  If you saw my first Tut, piecing the 2 sets of 5 squares into a star, why not take it a step further and really show off!  People will comment:   'Ah yes, those would be 72 degree diamonds', to which you would reply:  'Ah yes, but only if they were on the plane'.  They would walk off thinking either you are a maths genius or a complete prat!

Anyway, if you add a further set of 5 squares (in a medium colour, where the bottom 5 would be dark and the upper 5 would be light), it changes the pin cushion into something of a marvel.  If you use one of the heavier fillers for your pin cushion, it might also be used as a pattern weight or paper weight.  If you keep one of those in your pocket on the first weigh-in at WeightWatchers, you could remove it the next week, get weighed and in the meantime, eat what you want and apparently still loose weight.  I did it, so you don't have to.

Make sure you add your 3rd set of 5 with the point of the squares pointing downwards, as so....


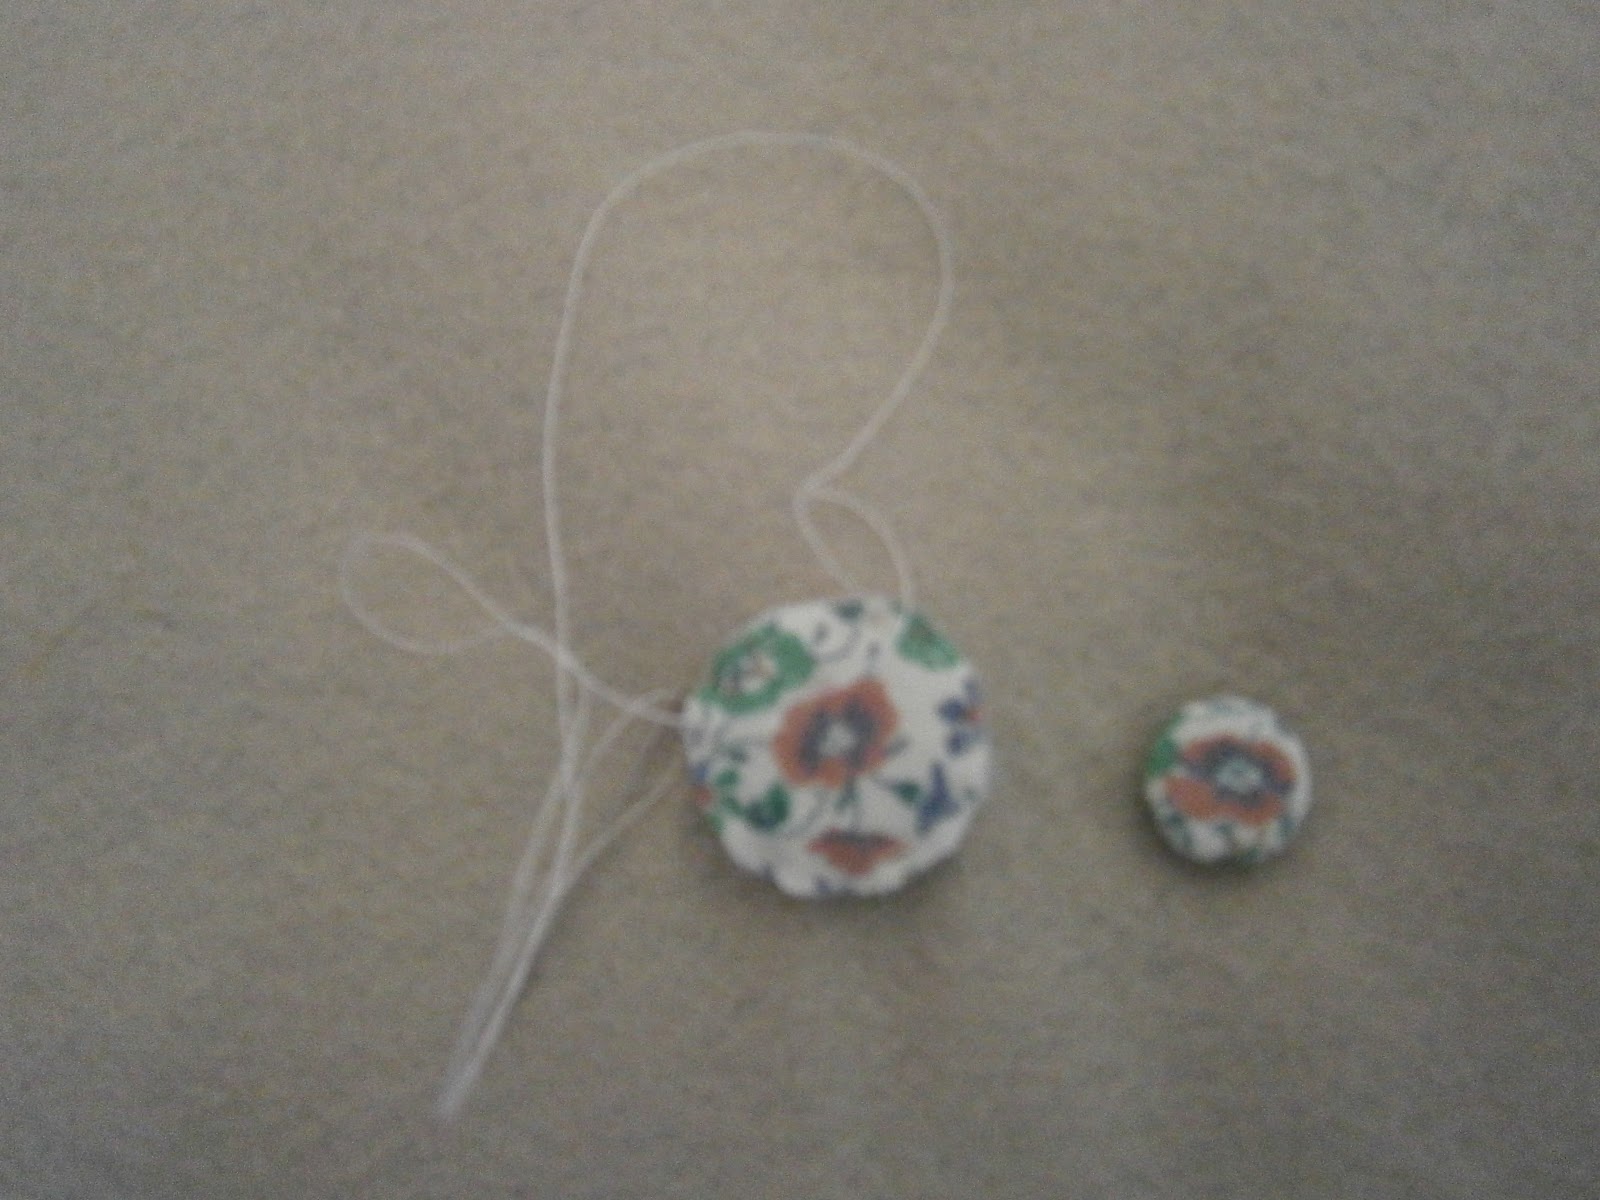
Make sure you add the top diamond by joining exposed point to exposed point and that's it. Don't forget to leave a gap in one of the seams.  Then you stuff it!  I don't like Polyfil, toy stuffing or wadding because they make the pin cushion to light for me - when I stab in a pin with one of those, they fly across the room.  (Much in the same way as a pig would if I turned up on time, finished anything, found lost items in less time than it takes a snowball in the freezer to melt.....).  Don't forget to use the doubled thread and pull the centres tightly, it really does make the points stand up much better.  Then, cover these stitches with a bead, button or my cheapskate home-made button (see Bit's I Forgot on the nineteenth March).  Most importantly,don't make your squares any smaller than 1 1/2" or they will have to take away all your sharp objects.


The next pincushion (made for the Icknield Quilters' Sales Table at the Baldock Festival on May 19th (nineteenth - this nine looks like four, but it is a nine) 2012 - have I mentioned that before?), is a Cath Kidston hexagon pincushion that you may have made circa 1972 - much with much lovelier fabric.  The papers are cut out, basted and pieced in the exact same manner as Tut 1.  Sew it together, leaving the usual gap, stuff and put in a drawer, never to see the light of day again (or... use it)

Then, lend your camera to someone before you photograph the finished item.

What about making one smaller?
I didn't like the finish on this one - too hard to turn out the  points so I made another one, ironed it thoroughly with the papers in, took the papers out and sewed it with a decorative stitch from the right sides, stuffing it lightly as I sewed.  This gave a much better finish.
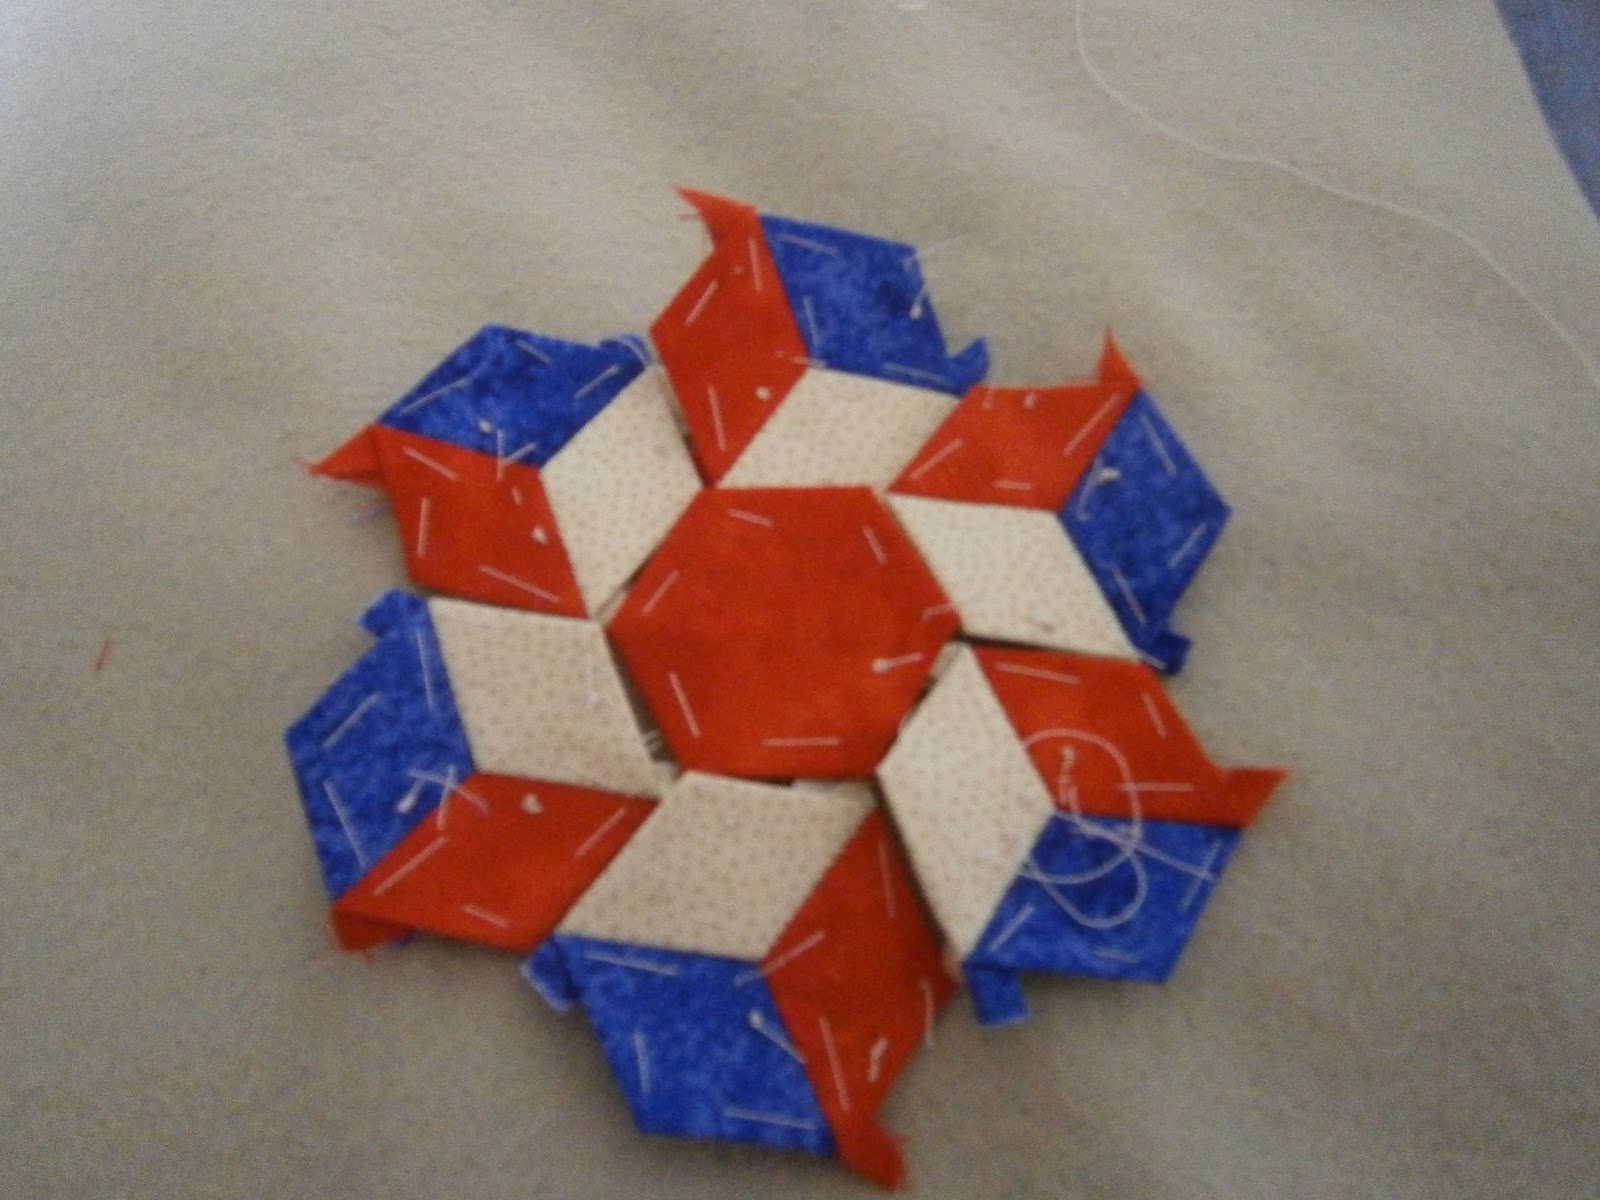
 What about making one with just 8 hexagons?  Notice that I have cut out my fabric in squares.  To cut the right size, just measure your hexagon across any pair of sides and add a 1/2".  That is the size square you need to cut out - cut a strip that width, then cut into squares.
Make the usual rosette/flower and then sew up adjacent sides to leave  just enough space for the  8th hexagon

You could also make 2 rosettes and then add, alternating, 6 more hexagons and 6 squares - make the square by laying one of the edges of the hexagon template against square paper, mark and cut out.  The square just has to have sides which are the same length as that of your hexagon side.  Sew the squares to the edge furthest away from the centre of the rosette/flower and fit the new hexagon in the 'dip'.  I make a string of these new pieces and then sew them on.  You will probably have to leave two sides of one of the hexagons unsewn on the bottom flower for turning out.

Next time:  Making Templates (should have been before this) and Getting Organised (just a little too late!).  
Come back soon, there will be chocolate.............

Thursday 15 March 2012

Big Project for March


I've now removed the fabric from the top of the mattress and it is now stopping the draft from my store room into my laundry room (sounds posh, eh?......isn't).  The next layer looks like compressed rags and threads, which came off in a roll, with just a few clumps.  I know what I'm doing with that!  Now it is naked coils of metal - just perfect for it's new use!
I've started taking apart the divan. the black plastic from the base will go into the garden to suppress weeds, as for the rest, I need to take the wooden slats supporting what I hope is hardboard and not cardboard for their new use and then cover the remaining frame with parcel tape and something to block off the sides (Hummm......?)


Festering:-  1)    I'm instructed by son Liam to make a Creeper from Minecraft??????
                  2)    Need to make an Easter thing with Double Knitting.  Given the time of year, something for   Easter?  Here's the mouse mat I made him for Christmas

 There's an excellent tutorial to explain this technique, where you knit two right sides at the same time here: www.knitting.about.com/od/colorknitting/ss/Double-Knitting.html.  I'm going to do one for myself in blue and white - some sort of winter scene.  I've been looking at dishcloth patterns for this project and have made quite a few as actual dishcloths, but not had the courage to use them!  I've knitted all mine in acrylic yarn to make them 'scrubbier', but apparently not using cotton results in having your needles confiscated by the Knitting Police (like the Quilt Police, but less pointless - hah, hah, huummmm).
                 3)   Had to restart my knitting for Lister volunteer Knitting Group.  I had only one ball and was to knit wrist warmers from this pattern.
Then, I had such a good idea: Just so I won't run out of yarn and to make them the same length, I'll knit from both ends of the ball of yarn!  I'll just need to find the end in the middle.  Oh, just how hard can that be....?
                   4)    I must complete my portable design wall.  So far, I have cheap wadding and low loft wadding (it might be Warm and Natural?), Copydexed to the insides of an old lever arch file and felt pages inside.  The felt is rubbish, by the way, everything just falls off.  Felt abandoned (hang on - tiny animals?).  I glued a length of ribbon to the inside before the wadding went on, in order that the file could be turned 'inside out' and the ribbons tied to hold it open......
This is the lever arch tied open with the ribbon from underneath.  You can just about see the wadding on the inside of the folder on the right


TOMORROW:-  ALL THE ICKNIELD HEXAGONS AND MAKING TEMPLATES FOR PAPER PIECING


Wednesday 14 March 2012

Normal service resumed tomorrow, but now something much more important

Tomorrow, at 3am, it will be the first anniversary of my kidney transplant.  I am taking the following letter to Addenbrookes for them to pass on to my Donor's Family.  If it touches you in any way, please consider signing up to the Donor Register and if you have, please make sure your family are aware of your wishes.

To My Dear Donor's Family

There are not enough words for me to express my gratitude for the courageous and selfless decision you made a year ago today. This week, I share just a little of the pain and grief you must have been suffering this past year.  I hope that hearing, just a tiny part about how your generosity has wholly transformed my life and the lives of my family and friends, will help alleviate your sorrow a little.

Before your kindness, my life was just ‘going through the motions’.  I could no longer take part in my hobbies or interests and even something as gentle as reading was occasionally too taxing.  My physical appearance changed in a most difficult way as the treatment, medication and Dialysis made my whole body swell up dramatically, particularly my face: I no longer even looked like me.  This was all very distressing.  Also, after working all my adult life, I had to stop.  I lost all routine and self-worth and felt a burden to everyone, especially my youngest son who took care of me wonderfully.  Then came the call……..

I will shortly be returning to work and becoming a productive member of society again.  I have jumped back into my hobbies with both huge flat feet!  I have become involved with many new hobbies, including writing a novel with two of my very good friends (look out for the personal appearance in W.H. Smiths!).  I have spent today with my youngest son and sewing – which is my favourite thing to do.  I haven’t been able to be creative for so long: ideas were becoming lost in a thickening haze.  I have been thinking up things to make at the Sales Table my local Quilt Group is having in May, with all the proceeds (and a generous donation from Glaxo) going to the Renal Unit of my local Hospital.  I’ve even started a blog and to try, and I say try, to become more organised!

I really cannot thank you enough for that dreadful decision you had to make.  You have completely transformed my life – I don’t have my life back again, I now have a much better life and that is entirely due to you.  I have had an e-mail from my manager in my last job which said: ‘It has been fantastic, not just for me, but surely for all of us to see you improving over the last year and getting back to your old self.  We are therefore, all grateful to your donor’s family that we can see you like this again’.

With all my best wishes and heartfelt appreciation of your thoughtfulness,
Penny

Friday 2 March 2012

First Tut (yeah, I know..........) Paper pieced star


Pick two fabrics.......

Cut out your templates (mine are 1 1/2" squares of old Christmas card and 2" squares of fabric (more about templates another day). Don't make your squares any smaller than 1 1/4" or you may need the people in white coats to come and take you away when you turn your finished piece out.  I use graph paper printed onto the card from this site www.printfreegraphpaper.com .  You can print any type and size of graph paper from here.

Fold the fabrics over the 'papers' and tack into place.  You might find it easier to pin the papers to the fabrics, but I prefer to hold them together, if needed, by using a paper clip.  Make sure the fabric is folded tightly  against the 'paper' and at the corners, put your finger nail against the next side to be tacked and fold that edge over, making a nice sharp corner.


The right side of the tacked square


         The wrong side of the tacked square


Tack all of your squares and with five squares of one of the fabrics, oversew the first pair together using whip stitch.  Make your stitches close and even and aim to pick up just two or three threads from each fabric.  That's the aim........


Sew four of the squares together, leaving one of the seams unsewn.  Add a fifth square and sew to the two remaining free edges


You should now have five squares of one of your fabrics joined.  Repeat this process with five squares of the other fabric.  Sew both of the 'stars' right sides together, leaving a gap as wide as possible on one of the sides.  Remove tacking and papers and turn out through gap.  Use a needle, gently, to make sure the corners are as  turned out and as square as possible.  
Fill with Polyfill, emery powder, Chinchilla sand or my favourites sawdust of chopped up ends of wool and threads (from tackings etc......)  
Cut and knot a double thickness of thread and sew through points at centre from both sides to pull the centre inwards.  Pull the thread tightly and knot.  Add buttons in the centre of each side.  See my home-made fabric covered buttons on 19/03/2012

And Tah-dah!!!!   Well, whadah yah know?!? Computer has completely fallen over and I can't add the finished pincushion.  Will go away and whine, cry, stamp feet and try to reload.  It never rains but it pours.


Whoo-hoo!
Next time, a variation on this and different way to prepare your papers and cut your fabrics.........


Thursday 1 March 2012

Coming soon.....to a living room near you!

Welcome!  Thank you for visiting.  Have a seat. Cup of tea?  Oh, you've heard....
This is what I will be posting in the next few days, plus hexagon stuff and Double Knitting.....
First of the stuff for the sales table at Baldock Festival 19th May 2012

First paper piecing tute

Death's Head Skull from www.woolythoughts.com

And this!.... is my big project for the month.  Can't tell you what it's going to be, in case it all goes pear-shaped, in which case I can then pretend that's just how it should be!

Come back soon and I will be starting paper piecing ideas and lots of new hexagon ideas