Friday, 20 April 2012

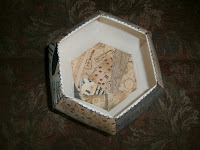
The Hexagon ressurrected - in a box

Base of box
Side view
Just can't get away from hexagons - thanks a lot Icknield Jacqui!
Top view


Here are the templates for the card/plastic and wadding pieces.  Your hexagon can be any size (mine had 3"  sides)  The side piece must have the same length straight edges as the hexagon edges. 
Copy and paste to print out
You will need to cut out :-


1 base, in heavy card for the bottom of the box. And cut 1 piece (1/2" bigger all round) of lining 
                                                                                  fabric


1 base in cereal box card*                                    And cut 1 piece (1/2"" bigger all round) in main                    
                                                                                  fabric


1 base in low-loft batting


6 sides in cereal card/plastic                                And cut 6 pieces (1/2"" bigger all round) in     
                                                                                  main  fabric


6 sides in cereal card*                                           And cut 6 pieces (1/2"" bigger all round) in  
                                                                                  lining fabric


6 sides in low-loft wadding


*  Don't cut any more than 1/8th smaller.  Cutting the same size is OK but just a little shaved off each side makes the assembly of pieces much easier.
Sorry about the confusing formatting.  It was created in old Blogger and new Blogger won't allow any changes.  Aren't computers intuitive and helpful!


This looks so much more complicated than it actually is to do!  Yet again, too many words and too little action.  Naturally enough, I've lost the photos been unable to upload the photos for each stage of this, so brace yourself, as they say! 


Cover all the pieces of card/plastic with fabric (and wadding where appropriate), by laying the  fabric right sides down, place wadding on centrally, lay the card on top.  Fold over edges and secure by glue stick or by threading from opposing sides.  Be careful to pull the fabric tight enough to make the corners neat and sharp, but not so tight that the box will try to turn itself inside out!  


The inside base and outside sides will all need wadding when covering the card/plastic.
The outside base and inside sides have no wadding.  Glue these wrong sides together.


I used the left over pieces of my main fabric and scrap pieced them like this for the inside base.

Secure the inside and outside sides together in their pairs (is this even English?), by glue stick.  I took each pair of sides (1 inside + 1 outside) and took large whip stitches (2 or 3 a side) all round the pair (these will be hidden when the sides are joined together).  I'm not allowed to play with glue - not after the last incident (you really don't want to know).  Suffice to say Superglue, fingers,  blah blah blah.


Join all the sides in a round with right sides out.  I use glove stitch and a double thickness of thread, but you could use any decorative stitch and maybe an embroidery floss?  Although, I'm not sure if floss would be strong enough as it has to hold all the sides together under quite some tension.


Decide which end of the 'tube' is to be the top and stitch all the way round with the same decorative stitch.


Join the base (make sure the main fabric is on the inside - I don't want any crying just as we are reaching the finishing post!).


By the way, the plastic is from a plastic 4-pint milk bottle.


Finito!  Cuppa.  Shoulder massage.  Chocolate, anyone?


Sunday, 15 April 2012

Return of the Hexagon - in a bag/purse


Another item for the Sales Table on May 19th 2012( Baldock High Street).  I've seen this bag all over the place, but normal size.  I like tiny (this purse is about 4" x 2") , so my hexagons have 1" sides, but you could make it with any size of hexagon.  The large bags don't usually have a flap like this one and have handles attached to the hexagons either side of the flap.  I started with two rows of hexagons, a single hexagon for the base and a triangle of 3 hexagons for the flap, but as all the pieces have to be lined (with fleece), I realised it would be easier if they were all joined before lining.  The base and flap cannot be joined anywhere along the length of the rows as there is some weirdness of sewing to complete the base and flap.

So, cover your paper hexagons and then join as so:-


There are two rows of 6 hexagons here.  How clever of me to photograph dark hexagons on a dark background - sometimes there's just no hope for some people.


Remove papers and back with fleece.  Quilt as you wish - around hexagons or  in rows - whatever you wish. Cut fleece to same size as piece - carefully!
Join the ends of the rows into a tube:-
Your fleece edges should match.  I've no idea why I cut mine so short and there was a price to pay:  I had to make  a ridiculously small pocket on the inside to cover up this mistake.
Turn to the base.  Sew with the fleece (insides) facing you.  This is the end of the tube with just one hexagon hanging on for dear life.  Sew both the sides adjacent to this hexagon together and also the sides of the hexagon directly opposite - Sorry, English is my third language, immediately after Utter Nonsense and Complete Rubbish.  Sew them like this - 


You should end up with this:-


Turn to the top of the tube, still with the fleece on the outside.  Sew together both of the two hexagon edges on either side of the flap hexagons

Turn right sides out and sew on press fasteners or Velcro dots to hold the flap in place.  Finished!


Now, have your underling rub your neck and shoulders until you doze off.

Welcome to the Body Farm/Teddy Bears' Picnic

More for the Icknield Quilters Sales Table in May (19th, Baldock High Street - please come and see out stall and making the raffle quilts)
This was a pattern I'd cut out years ago, probably from Woman's Weekly.  Ah yes, well on my way to blue rinses and twin sets, even then.  I lost the actual instructions and only had the pattern pieces cut out in card.  Unfortunately, I also lost the tummy gusset, so these bears are rather anorexic.  They are about 3 1/2" tall and are sort-of jointed (if you move the limbs only once!).  There are a lot of instructions (listen up now!), but they are easy, although time-consuming.
Copy and paste image to resize, if necessary (just how mad are you to make it this small?)
Print out the pattern on a sheet of card, draw round the shapes and back-stitch  an 1/8th  of an inch in from the edge of the fabric.  You could just as easily draw around the shapes and cut out leaving a seam allowance and sew on the lines of the pattern.  Alternatively, you could sew this on a sewing machine, but as the pieces are so small and fiddly that might be more trouble than it's worth.  You could also resize the pattern and make the bear whatever size you wish - it doesn't have to be this strait-jacketed small.  


I used to press small seams like these, or seams in quilt blocks, by finger-pressing or using a finger nail, but this can stretch the fabric (especially if it's on the bias).  I've been looking around for a wallpaper seam roller that is barrel shaped.  This could just be rolled along the seam on a hard surface without any stretching of the fabric and the barrel shape would stop lines/creases forming at the edge of the roller onto the fabric.  The cheapest I could find was a tenner, so I'm looking into making a home-made one of these.  For these bears, I pressed with the rounded end of a broken wooden cloths peg (wood seems gentler than plastic?)


Even better, had I thought of it at the time, would be to print the pieces directly onto fabric with Bubble Jet Set.  I am experimenting with making a home-made Bubble Jet Set type solution and will post it as soon as I can - this allows you to cover fabric with solution, let it dry and then the fabric itself can be put directly through your printer and then the printer ink is permanent and won't smear or bleed.  With such a solution, you would also be able to design your own fabrics or print  your pieces onto the fabric ready to cut out and sew, without the need for any templates.


 Instructions (shhh, I'm talking to you!)
ARMS      Join paws to arms, right sides together. Press.
                 Join backs and fronts of each arm (leaving openings to turn out), right sides together.            
                 Turn out and stuff firmly and close opening.  
I whip-stitched all the openings closed for the whole bear
LEGS      Join legs, right sides together, leaving the openings unsewn.
FEET      Join foot to leg with widest part of foot at the toe end.  You could pin this, but I just started at the toes and aligned the centre of the fat end of the foot to the seam in the leg and back-stitched all round.  Make sure wrong sides of the foot and leg are facing you.     
                Turn out, stuff firmly, sew closed.
BODY    Join body pieces, leaving opening open.  
               Turn right sides out and stuff firmly (I do this regularly next to the fridge).  Sew up opening 
 HEAD   Join head gusset to one of the sides of the head.  Make sure right sides are together.  Start at tip of nose and sew a few stitches to the top of nose and fasten off.  Sew the same pieces together from the neck end, easing in excess fabric of head.  Sew other side of head to the joined piece.  
                Turn right sides out and stuff firmly    
                Take tiny running stitches around base of neck and pull up tightly.
                Using embroidery thread, make eyes with french knots and sew a triangle for a nose.
EARS     Sew a running stitch around the outside of the circle.  Pull up over a smaller circle cut from card (I used my washers, from the Make Your Own Fabric Covered Button Tut).  Iron or press with your peg(!).  
                Cut thread and take out coin, washer, card........
JOIN EARS TO HEAD  Place flat on head, a little forward from the top and back-stitch through centre of circle.  Fold up both sides of circle and whip-stitch closed.

We now enter The Body Farm.........


JOIN ARMS TO BODY  Knot a doubled length of thread (as if your life depended on it - a big knot!).  Sew through one arm from the inside (side with paw pad) to the outside.  Sew back through this arm, the body and then the other arm.  Sew backwards and forwards a couple of times.  Sew back towards the body but bringing the needle out on a seam, knot and then run the end of the thread though the body and cut.


JOIN HEAD TO THE BODY  Run the (heavily knotted!) thread from where the leg will join, up through neck, through base of head (catching as much stuffing as possible), back down through the neck of the body and out from where the other leg will be attached. Pull tight.  Knot and run thread through bear and cut off.
JOIN LEGS TO BODY  As arms


Then you have your bear!  The arms, legs and head move, but are quite delicate.


 Now, go and have a cup of tea/coffee(whiskey?) and put your feet up.  I insist.

Tuesday, 10 April 2012

Phone Recharging Holder (and Keeper from losing the plug and cord)

I saw this great idea on the site here.  It is all over the place though, so I have no idea who first created the idea (apparently you are supposed to find the originator of any idea you post (Lord Lucan?), but so many people seem to come up with the same idea at the same time, that's often nigh on impossible to find the first one.)  I used an empty pancake mix bottle.  I know it's hardly trench warfare to make pancakes, but it was only 25p, but I can't miss a bargain - even one I don't need.

Oh dear!  Did I forget to mention that I'd bought two of them that I don't need?  How did that happen?
I drew around the label remains.  No, of course it wasn't that I couldn't be bothered to take any more of it off, it merely remained as a guideline for marking the cutting line. Although, in the end I had to - sometimes laziness never wins.  I also drew around the plug of the re-charger.


The you cut it out on the line.  This is after, of course, turning the house upside down to look for the pack of craft knives bought at the Pound Shop only a week ago (6 for £1 - such a good bargain, if only I could find them?).  In the end, I resorted to the usual: a sharp kitchen knife.

And, here it is in situ.............
As for the decoration?  On the site above, they use fabric.  I would like to use egg shells, like here.  But, I've no idea what Alcohol Inks (printer ink?) or Aleene's Tacky Glue are, but I have seen other sites that do this with Mod Podge.  No idea what that is either but I did find a site to make your own here, although this begs another question: what is Elmers Glue?  It says it's school glue and washable so I suppose Copydex would be our equivalent?  It also gets mixed half and half with water, but as the Mod Podge is part glue and part varnish/sealant (oh yes, I'm no stranger to crawling the Internet for hours, sometimes even looking for the answer to a particular question), so maybe the other half ought to be varnish?  One site, this one, explains why you need to buy the real-deal.  I feel some experimentation sidling up to me - I'm no stranger to white coats

By the way, if you have a spare hour (or week), try these sites:-
All sorts of interests
For crafts

See you on the 10th.

April Big Project

I was so  lucky and 'won' this sewing box on Freecycle (www.freecycle.org) and it will be my big project this month.


I haven't decided how to renew it yet, but whatever I do, it will need sanding first.

 Last months project is hanging on like Clegg to the Tories.  The 'waterproofing' of the wooden frame by parcel tape didn't work, neither did the cutting Tesco bags into strips, stretching and winding on.  I'm thinking now of car spray painting it - that stays out in all weathers, but what else does?  So, this is yet one more thing to not get finished on time  be a little more troublesome than expected -   I won't be beaten by wood (although, some might think that a good idea).

Thursday, 5 April 2012

Circular/straight Knitting Swatches and wrist warmer pattern

I found a really good site that has so many great instructional videos:- vimeo.com
I went on it, looking for ideas about how to take better photo's - I know, I know, hardly necessary - but there is a wealth of interesting videos, not just about how to make your own videos, but loads on everything under the Sun.  I found this really good one about making swatches (for circular knitting, but the idea would work for any sort of knitting)  vimeo.com/7648397   I also found a good one for quilting:- Eleanor's Block Party 2012 (but also loads of others of hers).  She demonstrates a block in front of a frenzied crowd group of quilters and then chucks in a bit of cooking.  I've watched January's and will have a go, but I think I will make my blocks smaller - hers are 6" and 12"  This is at vimeo.com/35543434

I haven't knitted anything really since my boys were little, but there is all this weird stuff around now: illusion knitting, double knitting, teeny knitting, all sorts.  It's  not just sweaters any more. I am making a Sarah Lund type sweater (just love all the Scandinavian thrillers and political TV at the moment).  It's circular so no sewing up it will be a new technique for me. It's here  http://www.garnstudio.com/lang/us/pattern.php?id=4305&lang=us
Naturally, it's free, but they have lots of free patterns (as well as those for sale) and currently have Easter Workshops on their home page, also free.

I've also finished my wrist warmers (in only 5 weeks - honestly!), as part of the Lister Hospital Volunteers' Knitting Club.  They even stretch over my hands which I'm breaking in for a gorilla.

 They are so easy to knit - just a rectangle, folded in half and then the long seam stitched.  Leave a gap in the sewing-up for the thumb 1 1/4" down and the same size unsewn.
The Pattern
Gauge: 22st x 28 rows.  I was shocked that I needed to use 2 sizes smaller needles - no wonder nothing I made ever came out right knitting was always so much of a challenge.
Cast on 31  37  37  43  stitches (to fit 4-6 years  7-9 years  10-12 years  Adult)
Knit straight until piece measures 17cm  21cm  25cm  29cm
Work 4 rows is garter or K1P1 rib/moss stitch for the 'cuff' end..  Cast off and sew up.  Well done, you!

This particular pattern was     Row 1  S1, *yrn,p1,p3tog,p1,yon,k1, rep from * to end
                                             Row 2  S1, p to last stitch, k1
                                             Row 3  S1, k to end
                                             Row 4  S1 ,p to last stitch , k1
But you could use any pattern (show off) or just stocking or garter stitch throughout (ah, bless!)

Off now to parcel tape a bed frame.............See you on the 10th

101 Uses for an empty plastic milk bottle - mini greenhouse and compost pourer

I've just planted 4 Kelveden Wonder garden pea seeds in 2 cut-in-half toilet roll tubes.  I put them into a cut-down plastic milk bottle filled them with compost, made a hole with an old straw.  I'm planting 4 of all I shall grow this year each day.  Tomorrow, my seed potatoes will reside in an old flip-top bin, on top of 6 inches of soil and compost and covered with the same  My son is mortified as there is also an old 3-tier veg rack that I'm going to grow strawberries in when I come across someone selling them.  Indeed, there is more kitchen in the garden than he would like!. I sometimes still fill obliged to fill my motherly duty to embarrass my sons - that's just life.


I never throw anything away - last night I was asked for a folder and one AA battery -both close to hand.  Ask me where my handbag or car keys are though.....................?  There's such a joy in making something from junk.  My Big March Project has slipped into April, but will be finished over Easter and my Big April Project is filling up the kitchen - damn!  I just can't get near the cooker.  Ah well, sacrifices always have to be made in the interests of 'Art'.  I've just picked up an old sewing box from groups.freecycle.org  It needs sanding and painting or varnishing and a bit of TLC.  People are really generous to give things away, but I'm so pleased to have 'won' this item.  I've also picked up some cupboard doors (Big May Project) that will fill the space where another door was and also make an individual (for one person, not something unique!) breakfast bar.  Fingers crossed!